Showing posts with label Android. Show all posts

Tuesday, 19 April 2016

How To Use Facebook’s Messenger Bots Right Now?


How To Use Facebook’s Messenger Bots Right Now?

If you are scratching your brains wondering how bots on Facebook look like and how do they operate, calm down. These are simple bots dedicated to a particular service and you can use them right now.
But, at the moment, they are pretty confusing and unintuitive. Many times the bots don’t know what to do and you end up struggling getting any work done.
To make things easier for you, I tried Facebook Messenger Bots myself. I started with Facebook’s very own F8 bot. You can access it via m.me/f8bot. As you visit this URL on your phone, you’ll be asked to choose Messenger or Facebook app to proceed.
I chose Messenger and here are the screenshots of my chat with F8 Messenger Bot.
                              

Next, I decided to try out another Facebook Messenger Bot that was showed off during the F8 keynote. Yes, I’m talking about Poncho, the weather-bot that pretends to be a cat. Chatting to Poncho was better than my F8 bot experience. You can access Poncho via http://m.me/hiponcho.
You can find Poncho and other bots like CNN, WSJ etc. at botlist.co and use them right away.
Here’s how my chat with Poncho turned out:


Friday, 1 April 2016

Install custom ROM to your smartphone.

Hello everyone , Welcome to UserX , today we will like to introduce you about custom ROM .
Most of you might be aware of that and most won't.
So let get to the point.

What is ROM ?

Without getting in deep , in simple words a ROM is modified version of Android. If you are using Xiaomi Phones, then you are using MIUI ROM , if you are using Huawei Phones then you are using EMUI , and if you are using HTC phones then you will be using SENSE ROM.

It means most of the companies modify the original android , (if you have ever used NEXUS phones , they are pure android directly from google without any modifications.)
When you buy a new phone , the originally installed ROM is called Stock ROM.

What is Custom ROM ?

Now , if you are bored with your stock ROM or wanna try some new ROM on your phone , then there are many ways you can do so , that is installing the ROM of other mobiles , to your mobile.
(Like installing iOS to your android phone , isn't it cool ?) or (installing Samsung Galaxy S6's ROM to your Redmi Mi4). Obiviously it sounds nice.

So let's begin ,


What you Need ?

1. Rooted Android Phone.

2. Custom Recovery , (TWRP or ClockWorkMOd)

3.Custom ROM for your phone From here.


Once you've downloaded the files and set up your device , you can follow along the instructions from right Here. And amke sure to back up your Stock ROM before continuing the process.


If you have any questions please let us know in the comment section.
We're Happy to Help.

Thursday, 31 March 2016

HOW TO SET WHATSAPP PROFILE PICTURE WITHOUT CROPPING

Hello friends today I will tell you how you can set your whatsapp profile dp without crop. generally when we are set any profile dp on whatsapp firstly it says to crop the picture and then set. But now I have a trick by which you can set whatsapp profile dp without cropping. Follow below steps:

How to Set Up Whatsapp Profile Picture without cropping

At First, Install #SquareDroid — Full Size Photo app from here Download


After Successfully install, Now open the app, & you will see a Full menu in it. about “Pick a Photo” “Take a Photo” “Settings” etc.
Then Choose “Pick a Photo” option from here & It will show full menu, now select picture which you wanna set as profile picture without decreasing it’s size.
It will Automatically Resize That Picture & Picture will Crop instantly, Without Loosing anything in pic, & Pic will remains full & will not looks ugly after resize it.
So After Crop, Now Save the Picture in the Gallery & Open Whatsapp, & Set newly Created profile Picture Without loosing size.

Saturday, 26 March 2016

Samsung Galaxy S7 hack allows you to use Dual-SIM and MicroSD together

Samsung Galaxy S7 edge hack will allow you to use microSD and dual SIMs at same time

Samsung has launched its new flagship, the Galaxy S7 and S7 Edge. While both the new Samsung smartphones have been heartily welcomed by Android fans worldwide, they lament the fact that Samsung has not provided a separate slot for SIM as well as MicroSD card in the dual-SIM enabled Galaxy S7 Edge smartphone.
The Samsung Galaxy S7 Edge dual-SIM smartphone version buyers can either choose additional storage through microSD card and a single SIM card or dual SIMs and no additional storage. However resourceful hackers have found a way to bypass this restriction and add both dual-SIM and microSD capability to the Galaxy S7 Edge smartphone.
The hack which has surfaced online requires some modifications to your SIM card and your microSD card so that you can use both SIM slots and a microSD card at the same time. Do remember that the modifications are risk and you might destroy your SIM card and your microSD in the process. There is also a chance you might damage your new smartphone, so beware.
For modification process you need a nano SIM card, lighter, scissors, tape or glue, memory card, and the willingness to risk your new Samsung Galaxy S7 Edge. This hack requires you to heat up the back of the SIM card and then hack the actual SIM chip away from the plastic backing leaving you with only the gold contacts and no plastic surrounding it. You then have to precisely trim that SIM card.
Once you have the card trimmed per the steps according to a tutorial posted by noreplied, you have to glue or tape the SIM chip to your microSD card in a precise location.
maxis-hot-link-sim
The modification also requires some precise and skillful engineering especially while removing the chip from the Nano SIM.
celcom-sim-remove-1
Next, with the same precision you have to trim your SIM card.
nano-sim-chip-trim

As it turns out the trimmed SIM card can fit onto the microSD card in such a way that the contacts for the memory card can be read at the same time the SIM is read in the dual-purpose slot.
attach-nano-sim-micro-sd
If you trim and glue precisely enough, you should be able to configure the new SIM card with the dual SIM manager application in Galaxy S7 Edge.
If you see the dual-SIM option that means you have done a pretty good engineering job. Once done, your engineering feat will give you both a second SIM card and additional storage to enjoy for your content.
Remember you have to follow all the steps precisely otherwise you may end up messing your brand new Samsung Galaxy S7 Edge smartphone.

Sunday, 20 March 2016

Run Windows XP on Android


Hey Guys Welcome UserX:The Dark Net,
We're Back this weekend with another cool tricks for our visitors, we hope that you are enjoying our tips and tricks , which we keep post for you guys, just let us know to make your experince better with UserX.

Now , back to the point , so if u really freaking about using  an PC operating System on your Android Device , then this trick is for you guys.
Actually you can install a number of OS on your android device , but this one WinXP is bit an easy task , as it does not require huge memory size and RAM.

So let begin , we have posted links to get your job done in simple and easy steps.


1.For Youtube video :- Click Right Here
     
 
                             OR


2.For textual instructions  (Step by Step) :- Click right here.

Friday, 18 March 2016

How to install external apps on NOKIA 220 and NOKIA 225.

HELLO Guys ,WELCOME.TODAY ,I am going to show you how to install apps on NOKIA 220 and 225.

I have seen a lot of people getting trouble in finding and installing apps for their Nokia 225 & 220. To help them I made this beautiful tutorial, explaining everything about the phone.If you bought this phone then you may know that you cannot install any java based application in it. But why?

IT is so because,Nokia 225 and 220 uses 30+ series Operating system for mobile devices, which is not a Java OS and it is compiled using C and C++. As a result, you cannot install any Java (.jar) apps.

Nokia 30+ series is an operating system which is developed and used by only MICROSOFT. These mobiles are powered by mediatek chipest.
  • These Phones use MRE apps and the Default file extension of Nokia series 30+ is .Vxp.
Some apps may not work.This is a RAR FILE.

Download: https://drive.google.com/file/d/0B6-j2v8pzJM_VTdRMXIxaWI2dEk/view?usp=sharing  


HERE IS A PROOF OF THIS:

ENJOY BY USERX TEAM.


Thursday, 17 March 2016

How to enable virtual assistant for ANDROID.

Hello guys.I think you have seen the new iPhone assistant siri .This function of iPhone is quite amazing.So guys I am going to show you 'how to enable hands free function in android'.If u want to use this function properly then u have to root your phone.First of all update your Google app and then download open  mic + from playstore .Then download commandrr apk from Google play store.From comandrr u can edit ur commands.Don't download tasker app if asked.Now open open mic + and touch play button.And try to say the hotword you have selected and then speak the commands.Note : All commands are case sensitive.

POINTS TO BE NOTED : 1) This thing will not work on those devices in which GOOGLE launcher is installed.
2)Don't use tasker app .It will not work.

Enjoy. USERX COMMUNITY.

Sunday, 6 March 2016

Speed Up Your Android Device!(NO ROOT)

Hey What's up  Guys,  Welcome to UserX

Today I'am gonna tell you a secret trick in your Android Device which can be used to speed up your device . I mean isn't it cool to be  a fast processing device? The same device you used for couple of months can work faster by a small trick.


All you have to do is follow the instruction below :-

Step 1. Close anything that is being running in the background.

Step 2. Now navigate to Settings , then About Phone.


Step 3.In About phone option, you will see some thing like "Build Number" , just go to that and keep tapping it about 9 times  (Be quick )


After that you will see a message saying "Now you are a developer"

Step 4. No go back to stetting again ,and you will see a new option called "Developer Option"


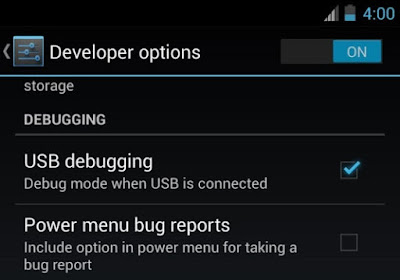
Head to Developer Options(make sure it is turned on at top of your screen) , and navigate to

         (i).Window animation scale  (change it to 0.5 {minimum the number , fast is processing})
        (ii).Transition animation scale (change it to 0.5)
       (iii).Animator duration scale(change to 0.5 too)
By default these are 1 , you have to change to 0.5 one by one.


Quit everything and feel the difference and let us know if you face any problem.

Thanks.

Sunday, 21 February 2016

How To Change Boot Screen In Android Phones


Hello Guys , Welcome To USER-X ,
We're back with another cool trick for all the android users.

So most of you might be using an Android Phone from a long , and it always boots up with the same screen as when you turn it on from switch off state, Right?

So , it might be a boring way , or you may have fed up with that old thing, so
Do you wanna try one ?

So this trick is for all geeks out there, who want to try something new.

So what is Boot screen ?

Ans :- The boot animation is the first thing that you see when powering on your Android phone or tablet, after the operator or manufacturer logo. Although it does not serve a purpose functionally, an eye-catching boot animation can certainly make your device stand out while booting. In this third installment of our Android customization series, we will take a look at how to change or even create your Android boot animation and will feature some of the prettiest and geekiest boot animations we have come across

Tools You Need to Change Boot Screen?
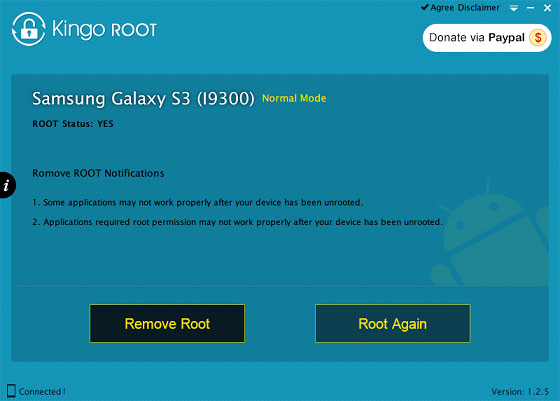
Ans :- 1. Rooted mobile phone(No idea what Rooted Phone is ? Get it from Here. Just download and click on root now!  ) 
2.ES file Explorer 


Step 1. Download the boot repositories from here , and make sure to download the correct resolution from Here.


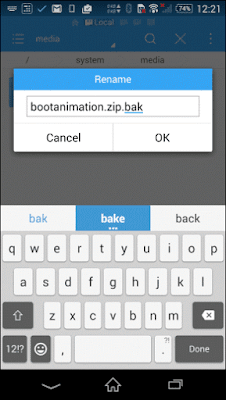
Step 2. Now open ES File Explorer and ensure you have enabled root explorer in its settings. Navigate to the folder /system/media and you will find a file named bootanimation.zip. Rename it as bootanimation.zip.bak. This will help you to revert to stock animation in the future. Having done that, paste the bootanimation.zip file that you downloaded from the internet to /system/media.


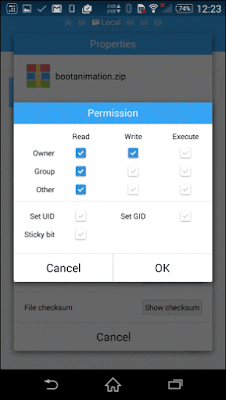
Step 3. One last thing before you reboot would be to fix the file permission. Long tap on the new bootanimation.zip file and change the permissions to rw-r—r—and save the settings.


Step 4. Now you're Done. Now when you reboot your phone, you will have your new android boot animation ready for you.


Note: Before rooting and trying these all tricks above , you might be aware of rooting a mobile phone and using tools after rooting your phone.


Friday, 19 February 2016

Clash Of Clans Hacked! Unlimited gems and coins(only at Userx)


PLEASE NOTE! Clash of Clans Hacked By UserX Mod  is free to download and play, however some Games items can also be purchased for real money. If you do not want to use this feature, please set up password protection for purchases in the settings of your Google Play Store App. Also, under our Terms of Service and Privacy Policy, you must be at least 13 years of age to play or download Clash of Clans Hacked !

1. Downlaod App Clash Of Clans 
2.Install It
3.Enjoy COC Hacked Unlimited gems and coins (ONLY AT USERX)


Saturday, 13 February 2016

(Loot) Paytm Tricks To Get Unlimited Free Recharge Using NEW50 Promo Code!

Paytm unlimited recharge tricks February 2016. Get unlimited free recharge using NEW50 promo code. [Working again]
After so many days, we have got success to reveal Paytm tricks. We have already looted Paytm using FREE25 & FREE10 promo code. Now it’s the time to loot through NEW50 promocode. Without wasting more times lets see how to get unlimited free recharge / talktime from Paytm ?

Paytm NEW50 Promo Code Tricks

  1. Download Paytm app
  2. Enter new mobile number, new email id, password & sign up a brand new account. You need to verify both mobile & email.
  3. Now use paytm wallet app & send Rs 50 to the newly created account from your old paytm accountOr directly add Rs 50 using any payment method.
  4. Now go to recharge mobile with Rs 50 & apply promo code NEW50
  5.  
    Paytm tricks using new50
  6. Complete your transaction using wallet balance
  7. That’s it. Your Rs 50 recharge will be successful instantly
  8. Rs 50 cashback will also be added within 1 hour
  9. Now it’s the main trick time
  10. Now again make a new paytm account using new mobile & email
  11. Now send Rs 50 (from previous paytm account where you got Rs 50 cashback)to the new paytm account
  12. Again recharge with Rs 50 using NEW50 promo code & complete transaction through wallet balance
  13. You will get Rs 50 cashback again to this account
  14. In this way keep making new paytm account as many as you can & get Rs 50 free recharge from every account.
Have any problem ? Feel free to say in comments. 

Cortana For Andriod


Cortana is an intelligent personal assistant created by Microsoft for Windows Phone 8.1, Windows 10 Mobile (where it now supersedes Bing Mobile), You Just need a Microsoft Account


Cortana - your personal assistant that keeps you up to date on what matters most.


So Do You need it on your personal smartphone? 

Ok So here is some interesting! Get Cortana for You Android Device


DOWNLOAD HERE - Cortana_Play_store

Wednesday, 3 February 2016

Uber unlimited rides hack.(Only at user x) latest trick 2016

             UBER HACKED!


HOW TO GET FREE UBER CAB RIDES WITHOUT ANY MOBILE NUMBER! 2016 New Trick


 [ IF YOU ARE CALCUTTA (KOLKATA) USER THEN DO NOT DO STEPS FROM 1 TO 3 ]

1. 1st of all download Fake Location Spoofer app. [ CLICK HERE ]


2. Turn on " Allow mock locations " option in settings / Developer options.


(If you cant see developer options, thengo to " About Device " and click on " build number " ( mi users click on " MIUI VERSION " ) mutiple times)


3. NOW OPEN ANDROID SETTINGS / LOCATION / TURN ON LOCATION / GOOGLE LOCATION HISTORY - CLICK ON IT AND CLEAR IT ... Now turn on GPS on HIGH ACCURACY and Now open fake location spoofer app and do as in image.


4. Download uber app from play store. [ CLICK HERE ]

5. Open app and register 


** Now Main Uber Free Ride Trick starts From Here**


6.Download Text+ App from Playstore- [click Here] and click on " skip " then " skip " then enter some details like name.


7. Click on menu and go to settings and click " contact info " and click " get my number " to get your number.


8. Now Goto above provided Fake Location app and select any Kolkata location There


9. Now Just open The downloaded uber app >> sign up fake India mobile number >>and apply code aadarshk17ue… ( if they ask anytime for otp then click on " X " icon from top left side. )


>> Now proceed for ride booking >> it will say verify mobile number >> then just click for change number and register for " US " Number >> and put canada’s number which you have created in next+ app 


Bingo!!! Its done Now Go For Free Uber Ride with This Trick 


10. On the next page you will be asked " Select how would you like to pay " and you have to click on " Cash "


11. Now click on the menu situated in the left upper corner and click " Promotions " and enter promo code " aadarshk17ue "


YOU WILL GET 250 Rs. AS PROMOTIONAL CASH.

loot Looo Uber Ko! :P 

Saturday, 9 January 2016

How to share pdf,Documetn,winrar and .exe files through Whatsapp!

How to share pdf,Documetn,winrar and .exe files through Whatsapp!

Whats app is a part of our social life. We share everything on whats app. We wish, greet our loving one on whats app. We invite our friends for a party on whats app .we share our mood or feeling on whats app. Basically it is way of sharing our thoughts and thing with others. We use this so called social app for sending photos, videos, greeting, wishes, songs, jokes, stories etc. These social apps like whats app are now becoming a part of our life. But sometimes we face problems using these app. talking precisely about whats app like

Problems faced by the whatsapp users:
  • Users can share videos, images and audio only. It doesn’t come with any built-in function that can allow users to share Doc, PDF, APK and more.
  • The size of any file to be share shouldn’t exceed 16 MB. It means videos over 16 MB cannot be shared. However, Whatsapp comes with functionality to compress or trim video files before you share.  However, it still has limitation. Sending very large videos is not possible.
  • While sending images, Whatsapp compresses and sends it to the recipient. Though you cannot find any difference on mobile, one can notice the quality reduction in computer. It will reduce the quality if you send HD images.
If you share or send an image on Whatsapp then the resolution of that image will be compromised and when your friend will view that image or video file on his computer then it will appear with bad resolution. Similarly when you share a video on Whatsapp with your friends or family then also you got the same problem. The second problem in sharing a video is the size.Whatsapp allows sharing of a video not more than 16 MB. A video whose size is larger than 16 MB will not be shared on Whatsapp. Now we have solution for all these problem. Today we will tell you the way through which you can counter all these problems once for all. We will tell you how you can send and share pdf files, zip files and big audio and video files without compromising with the quality of your original files.

Steps to follow :
  1. First of all, download and install official Dropboxapp. There is no problem if you have Dropbox account already. Signup for an account if you don’t have one. Login to it.
  2. Then download and install CloudSend. When you launch the app, you will go through a quick tour. All you have to swipe from right to left on your device’s screen. It will ask you to authorize this app by the end. All you have to click Allow. In your Dropbox folder, a folder will automatically be created named “CloudSend”. You will be able to control it completely. Now you can close the app after completing the authorization.
  3. In order to send any type of file, press and hold the file through file manager and choose Share button.
  4. Choose CloudSend option from popup. 
  5. Hold on while the selected file is being uploaded on CloudSend folder created on Dropbox. The duration of file transfer vary according to the connection speed and size of file. The best part of CloudSend is that it doesn’t have any restrictions regarding file size. You will have two options after completion of upload – Copy and Share. Either you can share file or copy the link of any file directly. 
  6. When you select Share, you will be able to share your file in different platforms like Email, Whatsapp, SMS, Google+, WeChat, Facebook and other applications your device have. Select WhatsApp. 
  7. It will prompt you to choose WhatsApp contacts you want to share that link with. Share that link with your desired recipient. It will show link with file name. If file is supported on your friend’s device, it will show the preview of file. Or file can also be downloaded through other browser.